
How To Use DataPeak Agentic AI
Build custom workflows or use ready-made AI agents to automate your operations.
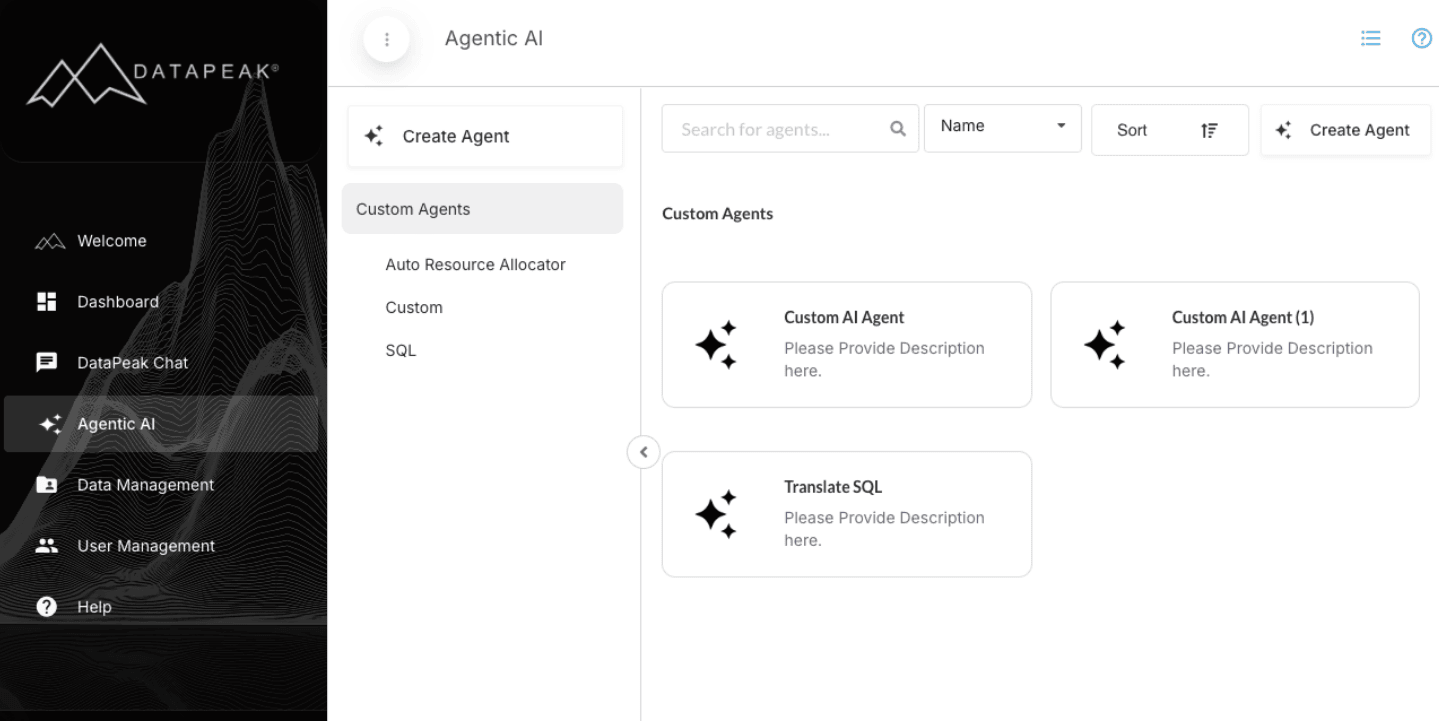
The Agentic AI section is where Admins and Sub Admins create powerful multi-step automations (Custom Agents) or use DataPeak’s pre-built System Agents. This guide explains how to access the page, create custom agents, connect components, run workflows, and use or manage System Agents.
1. Accessing Agentic AI
Sign into DataPeak
Click AI Agents in the left-hand sidebar
You’ll see two main sections:
Custom Agents (at the top)
Only Admins and Sub Admins can create or edit agents.
2. Custom Agents
Create your own AI-powered workflows step by step.
Custom Agents allow you to design fully automated workflows using drag-and-drop components. These can summarize data, query datasets, merge files, send outputs, create documents, and more.
2.1 Creating a Custom Agent
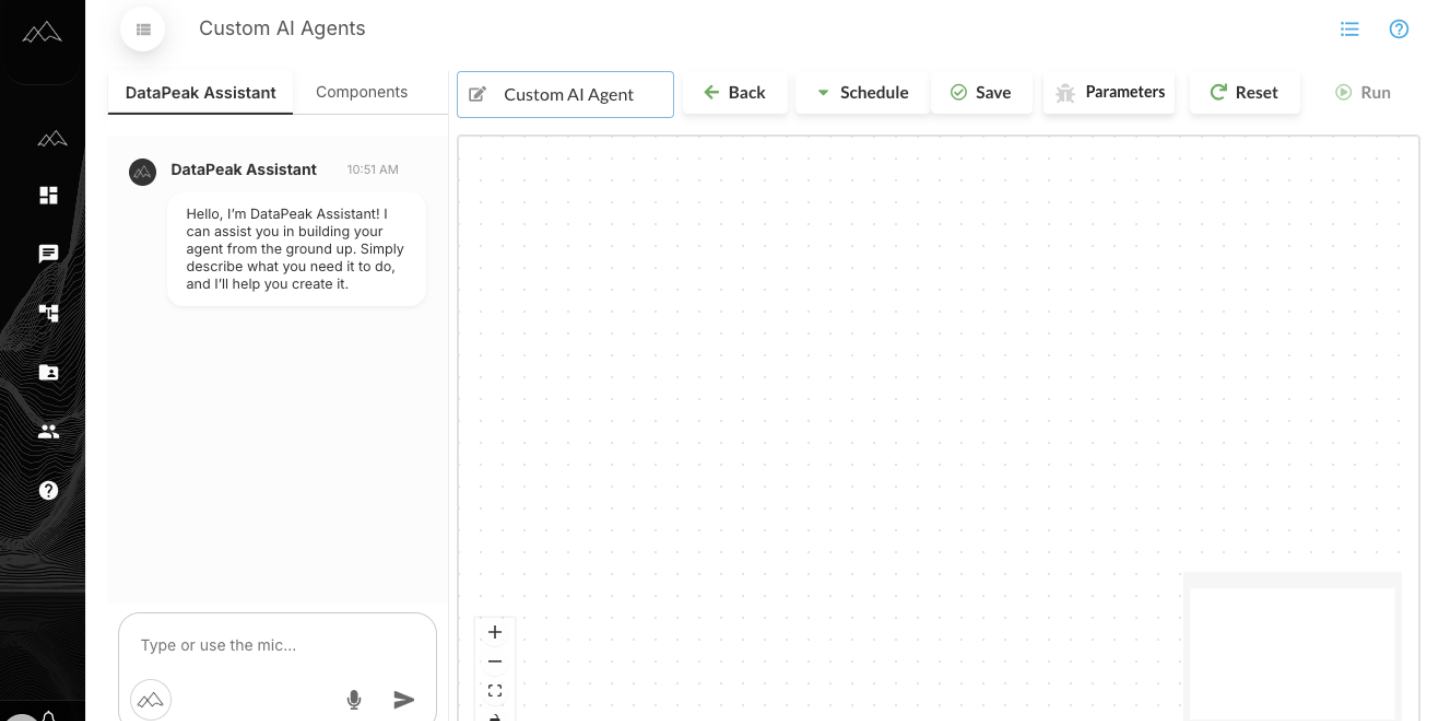
Go to Agentic AI
Click Create Agent
You’ll enter the Agent Builder interface
This is where you assemble your workflow.
2.2 Understanding Components
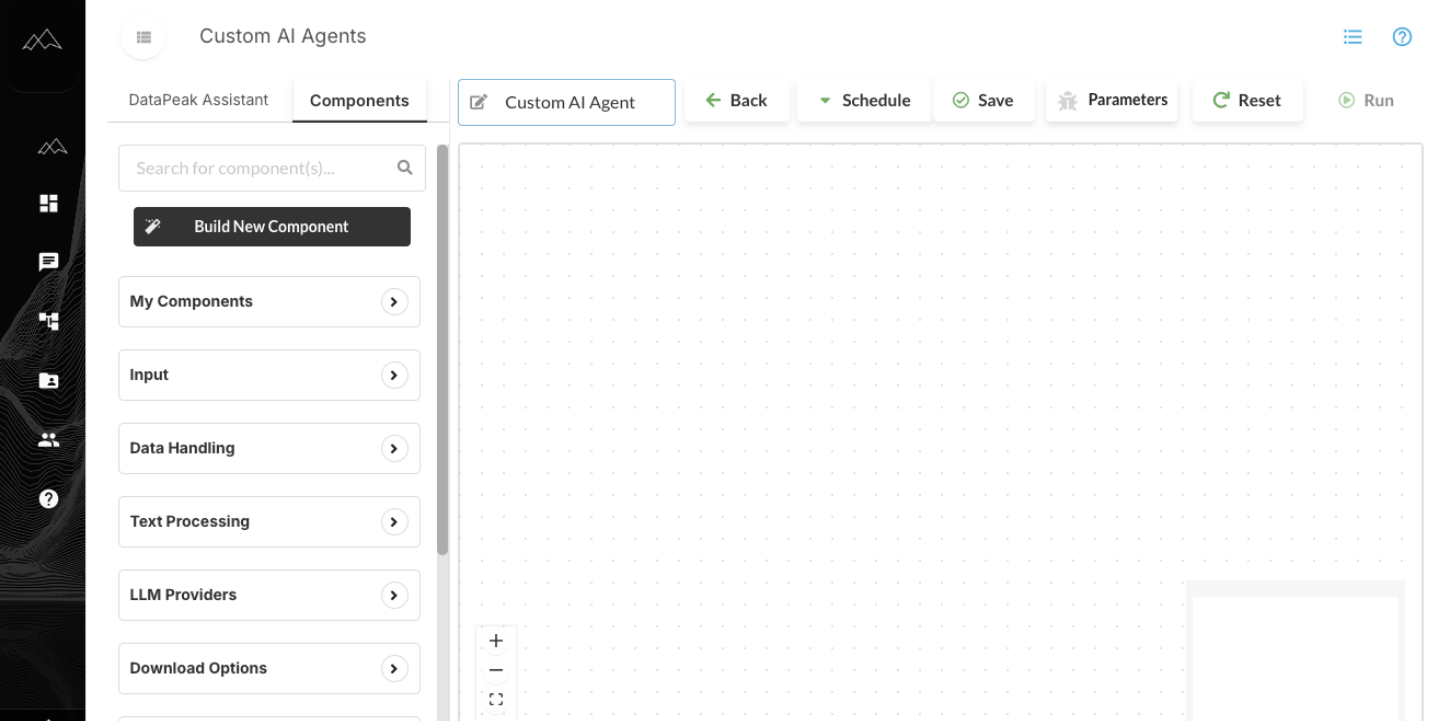
In the Custom Agent Builder, all available components appear in the left-hand sidebar. These components are grouped by function and can be dragged onto the canvas to build multi-step workflows.
Below is an overview of every component group, listed in the order they appear.
My Components
This section appears only after you have created and saved one or more custom components.
Shows reusable components you’ve built previously
Allows you to drag your saved components into any new agent
Ideal for standardizing logic across multiple workflows
Input Components
Used to bring data or variables into the workflow.
Includes tools such as:
Dataset Input – Selects the dataset used by the workflow
Data Connectors – Pulls in external or structured inputs
Every custom agent requires at least one input component.
Data Handling
Components that manipulate or prepare datasets.
Typical examples include:
Iterator – Iterates through the provided data for the attached components one-by-one
LIDA (Auto Analysis) Goals - Automatic generation of questions from dataset using LLM
LIDA (Auto Analysis) Output - Automatic generation of visualizations or infographics using LLM
JSON Parsers – Parse JSON object
LLM Prompt Engineering - Processes input based on user defined prompts
Use these when preparing data for downstream steps.
Text Processing
Tools that handle natural language tasks.
Includes:
Keyword Extraction – Identify key themes
Sentiment Analysis – Detect tone
Summarization – Condense long text
Useful for building agents that analyze or transform text.
LLM Providers
Allows you to choose which model powers a step.
Includes:
Amazon
Anthropic
Cohere
DataPeak
DeepSeek
Meta
Mistral AI
OpenAI
Drag one of these into the workflow when you need an LLM to interpret, transform, or generate content.
Download Options
Creates downloadable files within an agent.
Includes:
Word (.docx) Downloader
PDF Downloader
PowerPoint (.pptx) Downloader
CSV Downloader
Use these to automatically generate reports, files, or exports from your workflow.
Output Components
Controls how results are saved or displayed.
Includes:
Save as Dataset – Converts output into a new dataset
Graph Generators – Create visualizations such as:
Scatter Graph
Area Graph
Line Graph
Radar Graph
Pie Graph
Bar Graph
Output components often appear at the end of a workflow.
Notifications
Used to alert users when an automated workflow finishes.
Sends emails based on your configuration
Can notify multiple recipients
Useful for approvals, alerts, scheduled summaries, or operational triggers
Data Transformation
Tools that modify, restructure, or enrich data.
Includes:
PowerPoint (PPTX) Generator - Automatic generation of PPTX presentation from datasets
Translation – Translate text between languages
HTML Value Parser – Extract structured content from HTML
Group JSON – Organize or restructure JSON
Web Search – Query the web (if enabled)
Data Cleaner – Standardize and clean messy data
Data Merger - Merge data from multiple sources
Dynamic Column – Generate new calculated fields
JSX Attribute Retrieval - Extracts attributes (name, key, label, etc.) from JSX component strings
Image Annotation – Image annotation process with LLM
Column Appender – Matches or appends best matching values from one file to another
Data Relationship Comparison – Identifies relationships in JSON inputs through matching values
Video Annotation - Video annotation process with LLM
Structured Data Converter – Transform nested JSON structures into flat JSON structure
Field Replace - Compare two objects and update values from the second, where keys match
Column Filter - Filter columns to keep or exclude from your data table
These components are essential for shaping data before analysis or output.
Supply Chain Management
Specialized components for operational workflows.
Examples:
Inventory & Stock Management – Automate stock tracking, updates, or validation
Expiration Date Tracker – Flag products nearing expiration
Ideal for teams managing logistics or manufacturing processes.
Prediction
Machine learning components used for forecasting and modeling.
Includes:
Weather Correlation – Analyze weather effects on your data
ML Forecast Model Recommender – Helps select best-fit models
ARIMA Forecast – Time-series forecasting
ML Forecast – Predict future values based on historical trends
ML Forecast Comparator – Compare multiple model outputs
Remaining Useful Life (RUL) Prediction – Estimate equipment lifespan
These components power advanced predictive agents.
To add a component:
Drag a component onto the canvas
Repeat for all components you need
To configure a component:
Hover and click the gear icon
Or click Add Parameters on the component
Each component may have required configuration settings.
2.3 Linking Components

To create a workflow:
Connect the green output circle of one component
→ to the black input circle of another component
You can link multiple components to build branches or sequences.
2.4 Running a Custom Agent
Once your workflow is built:
Click Run icon.
Wait for the workflow to process.
Each component will show a green checkmark if successful.
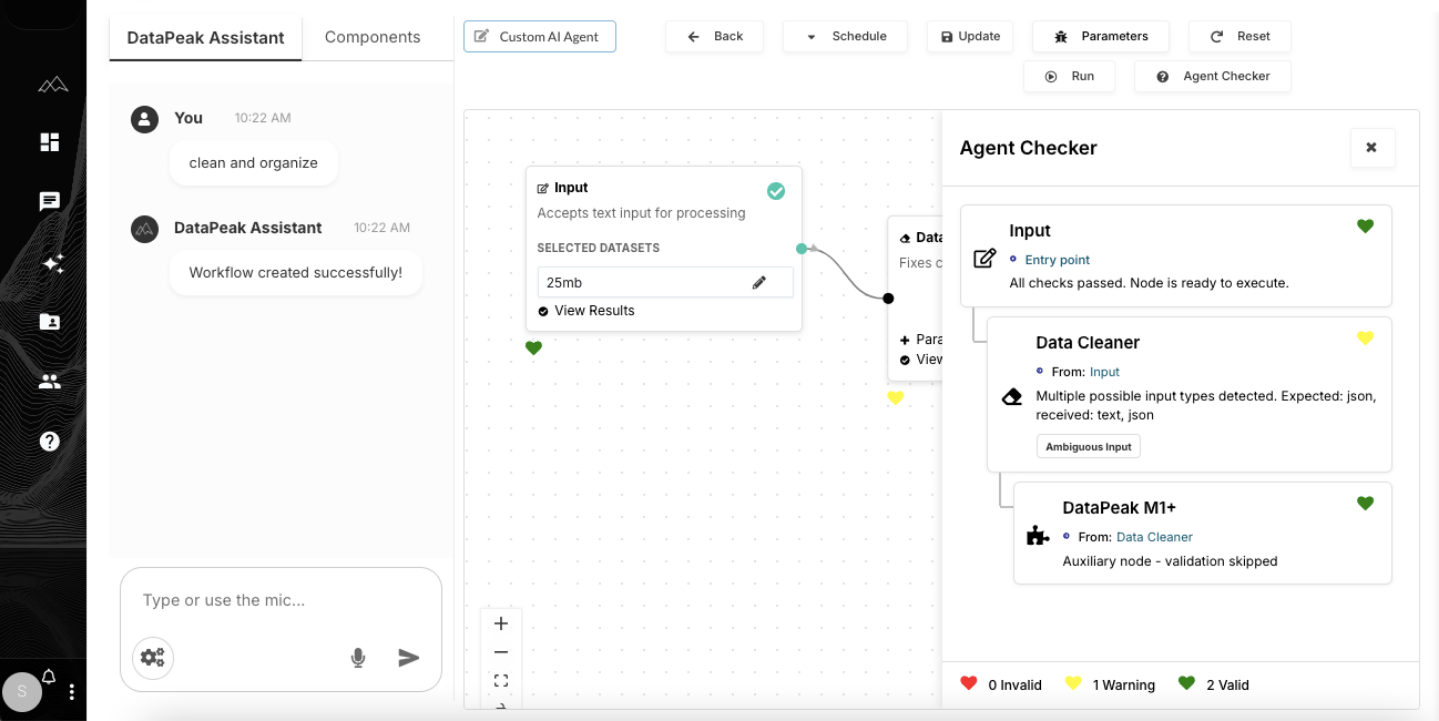
Validating Workflow Compatibility
Before running, use the Agent Checker panel to validate your workflow:
It automatically checks each node for input/output compatibility.
Warnings (yellow) or errors (red) will appear if there are issues.
Hover over any flagged node to view details and suggested fixes.
Viewing Results
Click any green checkmark to see output from that stage.
If your workflow includes a Download component (PDF, file, etc.), you’ll be prompted to download the file immediately.
2.5 Saving a Custom Agent
When your workflow works as expected:
Give your agent a name
Add a description
Click Save
Your saved agent appears under the Custom Agents section.
2.6 Using, Editing, or Publishing a Custom Agent
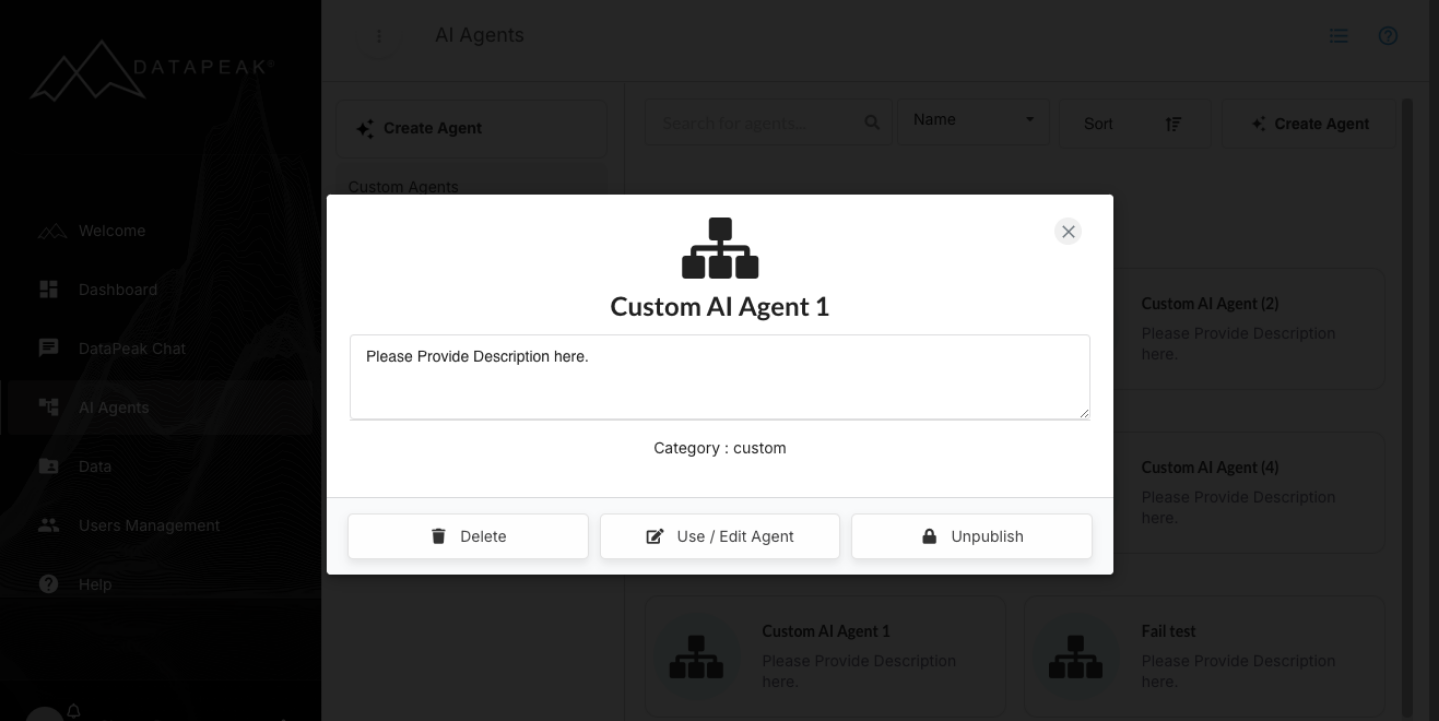
Click any saved custom agent to see actions:
Use/Edit Agent — opens it in the Agent Builder
Delete — permanently removes it
3. Custom Component Builder

If you need functionality that isn’t available in the standard components, DataPeak allows you to build your own reusable components directly inside the Agent Builder.
Custom components let you define transformations, calculations, summaries, or domain-specific operations, and save them for future workflows.
3.1 Creating a New Custom Component
Inside the Custom Agent builder:
Click Build New Component at the top of the Components panel.
A blank component block appears on your canvas.
Hover over the block and click:
+ Parameters
⚙️ (gear icon)
Either will open the Custom Component Configuration Panel.
This panel is where you define how your new component behaves.
3.2 Configuring a Custom Component
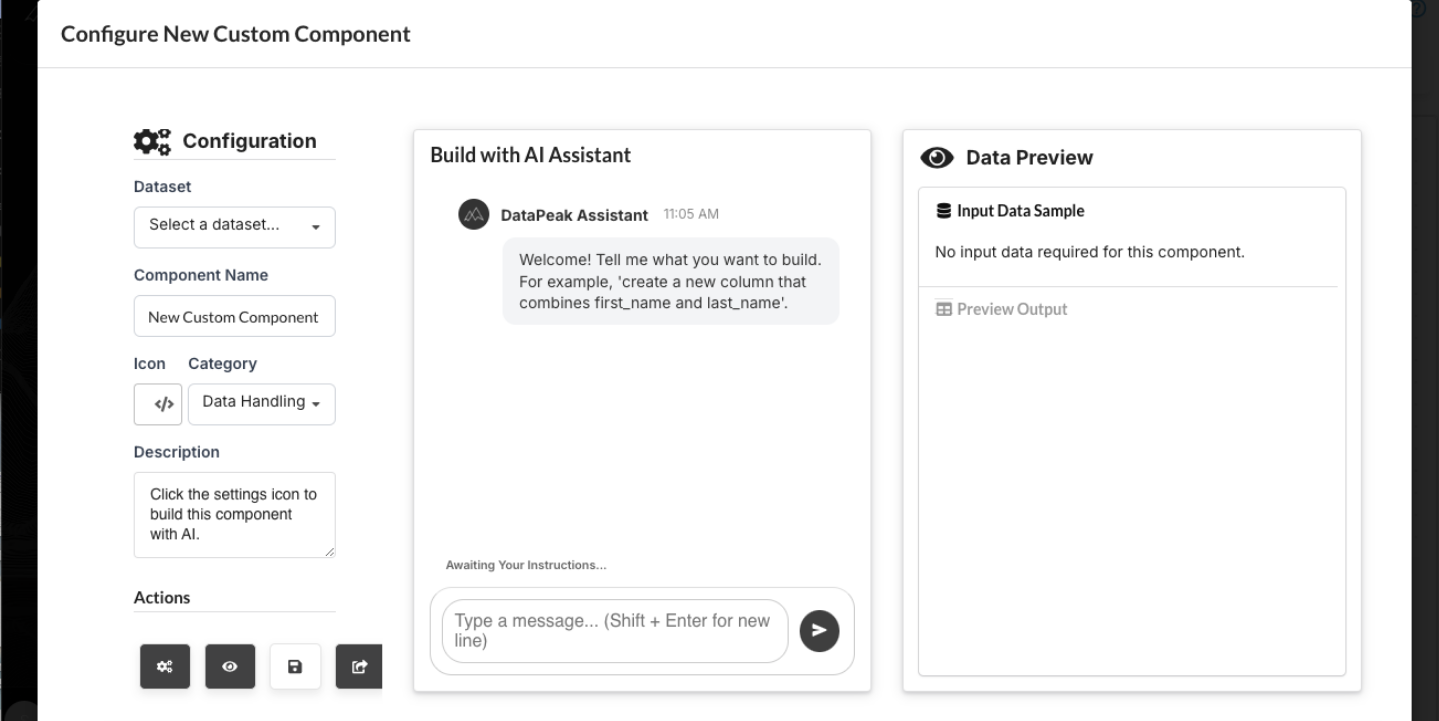
Inside the configuration view, you’ll see three sections:
Configuration, Build With AI Assistant, and Data Preview.
Configuration Section
Here you define the core settings:
Dataset → Choose the dataset this component will use
Component Name → Give your component a meaningful name
Icon & Category → Optional metadata to organize your library
Description → Explain what the component does
This is your component’s "identity", how it appears in the component library and in workflows.
3.3 Building the Component With the DataPeak AI Assistant
The Build With AI Assistant section lets you design your component simply by describing what you want it to do.
How it works:
Type an instruction such as:
“Collapse this dataset by year and calculate the total visits and downloads.”The Assistant will:
Confirm its understanding of your goal
Outline the steps it plans to take
Show a preview of the logic that will be applied
You can refine or correct its understanding with follow-up messages.
When ready:
You will be prompted to click Generate Component (the gear icon on the bottom left).
This creates the underlying code needed to perform the transformation.
3.4 Previewing Output
On the right side, the Data Preview window allows you to:
View the Input Data Sample
Toggle to Preview Output
Validate that the transformation is correct
Any changes generated by the component will show immediately, allowing you to confirm that everything behaves as expected.
3.5 Saving Your Custom Component
Once you're satisfied:
Click the disk icon or Save, to add your new component to your library
Your component is added to My Components (a dedicated dropdown in the Components panel)
You can now drag it into:
The current workflow
Any future Custom Agent workflows
Benefits of saving custom components:
Reuse across multiple workflows
Maintain consistent data operations
Build your own internal library of business-specific logic
3.6 Using Custom Components in an Agent
After saving:
Your new component appears in My Components
Drag it into the canvas like any other component
Connect it into your workflow to automate complex operations with a single block
Custom components behave exactly like built-in ones, but are tailored to your organization’s needs.
4. When to Use Agentic AI
Use Agentic AI when you need to:
Automate repetitive processes
Build custom workflows
Generate outputs (PDFs, files, summaries)
Query datasets without manual work
Process data across multiple branches
Enrich, monitor, or transform data